
You built your WordPress website. You wrote your content. But here is the brutal truth — without proper SEO configuration, Google will never rank your pages, no matter how good your content is.
Most beginners install WordPress, pick a theme, and start publishing — completely skipping the one plugin that could change everything. Yoast SEO is installed on over 10 million websites worldwide and is trusted by SEO professionals, bloggers, and business owners across every niche. It is not just a plugin — it is the foundation of a properly optimized WordPress website.
But installing Yoast is only half the battle. The real power comes from knowing how to set up Yoast SEO plugin in WordPress correctly — every tab, every setting, every optimization — so that Google understands your website and rewards it with higher rankings.
This complete step-by-step guide will walk you through the entire Yoast SEO setup process from scratch. By the end, your WordPress site will be fully optimized, technically clean, and ready to compete on Google in 2026.
Why Yoast SEO Is the Best Choice for WordPress in 2026
Before diving into setup, here is why Yoast SEO stands above every other option:
- Over 620 million downloads — the most trusted SEO plugin ever built
- Free version covers all essential SEO needs for most websites
- Real-time content analysis as you write — like having an SEO expert looking over your shoulder
- Automatic XML sitemap generation — no technical knowledge required
- Built-in schema markup — helps Google understand your content type instantly
- Seamless integration with Google Search Console and Semrush
- Regular updates aligned with Google’s latest algorithm changes
No other WordPress SEO plugin combines ease of use with this level of depth and reliability. Now let us set up Yoast SEO plugin in WordPress the right way.
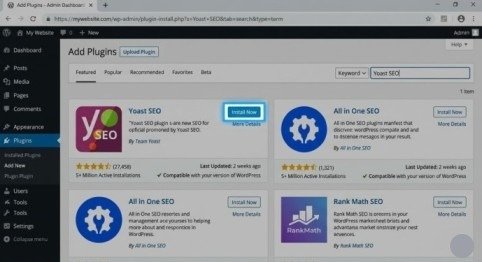
Step 1 — Install and Activate Yoast SEO
How to install:
- Log into your WordPress dashboard
- Go to Plugins → Add New Plugin
- Search for Yoast SEO in the search bar
- Click Install Now on the Yoast SEO plugin by Team Yoast
- Click Activate after installation completes
Once activated, you will see a new Yoast SEO menu appear in your left sidebar. You will also see a notification to run the First-Time Configuration — start there.
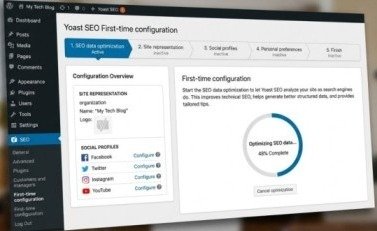
Step 2 — Run the First-Time Configuration Wizard
Yoast’s configuration wizard is the fastest way to set up your essential settings correctly from the beginning.
How to access it:
Go to Yoast SEO → General → First-Time Configuration
The wizard walks you through four key steps:
1. SEO Data Optimization Yoast scans your existing content and optimizes how SEO data is stored in your database. Click Start SEO Data Optimization and let it complete before moving forward.
2. Site Representation This is critical. Tell Google whether your website represents a Person (blogger, freelancer) or an Organization (business, brand).
- If Organization — Enter your organization name and upload your logo
- If Person — Enter your name and add a profile photo
This information feeds directly into Google’s Knowledge Graph — the information panel that appears in search results for recognized entities.
3. Social Profiles Add all your social media profile URLs — Facebook, Twitter/X, Instagram, LinkedIn, YouTube. This helps Google associate your social presence with your website and strengthens your brand authority in search.
4. Personal Preferences Choose whether you want to help Yoast improve by sharing basic usage data. This is optional and has no impact on performance.
Click Save and Continue after each step to complete the wizard.
Step 3 — Configure the General Settings
Go to Yoast SEO → Settings → General to fine-tune the core plugin features.
Site Features to Enable:
- ✅ SEO Analysis — Activates the focus keyword tool when writing content
- ✅ Readability Analysis — Gives real-time writing improvement suggestions
- ✅ Cornerstone Content — Lets you mark your most important pages
- ✅ Text Link Counter — Shows internal link counts across your content
- ✅ XML Sitemaps — Automatically generates and updates your sitemap
- ✅ Open Graph Data — Enables rich previews when your content is shared on Facebook
- ✅ Twitter Card Data — Enables image previews when shared on Twitter/X
Title Separator: Choose the symbol that appears between your page title and site name in search results. A simple dash (—) or pipe (|) works well for most websites. Keep it clean and professional.
Step 4 — Set Up Content Types (Posts and Pages)
Go to Yoast SEO → Settings → Content Types
This section controls how your posts and pages appear in Google Search results by default.
For Blog Posts:
- Show in search results: On
- SEO Title template: Post Title – Site Title (clean and descriptive)
- Meta Description: Set to use the post excerpt — make sure you write custom excerpts for every post
- Schema type: Set to Article for blog posts
For Pages:
- Show in search results: On
- SEO Title template: Page Title – Site Title
- Schema type: Set to Web Page for standard pages
Important: Enable the SEO Controls and Assessments option for both posts and pages. This activates the Yoast meta box in your WordPress editor — the place where you optimize each individual piece of content.
Step 5 — Configure Categories and Tags
Go to Yoast SEO → Settings → Taxonomies
Many beginners make the mistake of indexing all their category and tag pages without optimizing them — which creates thin, duplicate content that hurts rankings.
Best practice settings:
- Categories — Keep indexing On if you write unique descriptions for each category. Go to Posts → Categories, click Edit on each category, and fill in the Description field with 100 to 150 words of original content.
- Tags — For most websites, set tags to No Index unless you have a large, well-organized tag structure. Unoptimized tag pages create duplicate content issues.
- Show category prefix in slug — Turn this Off to keep your URLs clean (removes /category/ from category URLs)
Step 6 — Submit Your XML Sitemap to Google
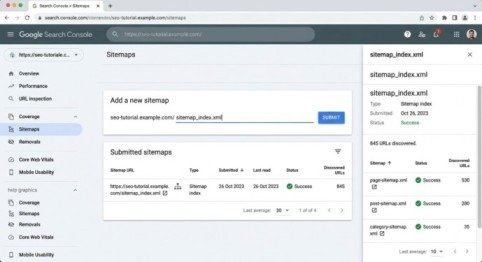
Yoast automatically generates an XML sitemap for your entire website. Submitting it to Google Search Console ensures Google discovers and indexes all your pages as quickly as possible.
Find your sitemap URL: Your sitemap is automatically located at: yourwebsite.com/sitemap_index.xml
Submit to Google Search Console:
- Open Google Search Console
- Go to Sitemaps in the left menu
- Enter sitemap_index.xml in the URL field
- Click Submit
Google will confirm how many pages it discovered. Check back after 48 hours to see how many pages were successfully indexed. If the indexed count is much lower than submitted, use the URL Inspection Tool to diagnose specific pages.
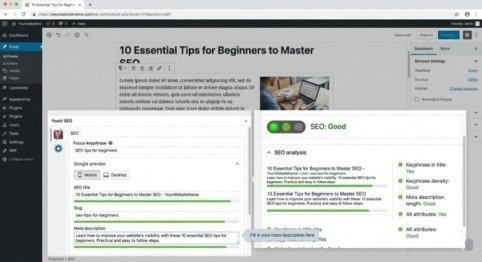
Step 7 — Optimize Every Post and Page Individually
This is where the real ranking power of Yoast comes alive. Every time you write or edit content, scroll down to the Yoast SEO meta box below the editor. Here is what to optimize on every single piece of content:
Focus Keyphrase: Enter the main keyword you want the page to rank for. Yoast will analyze your content and show you exactly what to improve — keyword in title, in introduction, in headings, in meta description, and keyword density throughout the text.
SEO Title: Write a compelling, keyword-rich title under 60 characters. Include your focus keyword as close to the beginning as possible. The colored bar below the title field shows you when the length is perfect (green), too short (orange), or too long (red).
Slug: Keep your URL short, clean, and keyword-focused. Remove filler words like “a,” “the,” “and,” “in.” Example: instead of /how-to-set-up-the-yoast-seo-plugin-in-wordpress, use /set-up-yoast-seo-wordpress
Meta Description: Write a 140 to 155 character description that includes your focus keyword and gives readers a compelling reason to click your result over competitors. Think of it as your search result advertisement.
Readability Analysis: Check the Readability tab and address any orange or red signals. Common improvements include shortening paragraphs, using more transition words, adding subheadings every 300 words, and converting passive voice sentences to active voice.
Step 8 — Configure the Advanced SEO Settings
Go to Yoast SEO → Settings → Advanced
These settings control how search engines crawl your website and can save valuable crawl budget — especially important for larger websites.
Recommended settings:
- Remove unnecessary metadata — Enable this to clean up your page source code and remove WordPress default meta tags that have no SEO value
- Disable unused content formats — If you do not use WordPress post formats (video, gallery, quote), disable them to reduce unnecessary URL variations
- Clean up internal search URLs — Enable this to prevent internal search result pages from being indexed
Be cautious: Only change settings you fully understand. When in doubt, leave the default configuration unchanged.
Step 9 — Set Up Breadcrumbs
Breadcrumbs are navigation links that show users and Google exactly where a page sits within your website structure — for example: Home → Blog → SEO Tips → This Article.
They improve internal linking, help Google understand your site hierarchy, and can appear directly in Google Search results as part of your listing.
Enable breadcrumbs in Yoast: Go to Yoast SEO → Settings → Advanced → Breadcrumbs and toggle them On
Add breadcrumbs to your theme: If your WordPress theme supports breadcrumbs natively, enable them in theme settings. If not, add this code to your theme’s header.php file above the content area:
<?php if ( function_exists(‘yoast_breadcrumb’) ) {
yoast_breadcrumb(‘<p id=”breadcrumbs”>’,'</p>’);
} ?>
If you use a page builder like Elementor, look for a Breadcrumbs widget in the widget panel — no coding required.
Step 10 — Connect Yoast to Google Search Console and Semrush
Google Search Console: Go to Yoast SEO → Settings → Site Connections and paste your Google Search Console verification code. This officially connects your website to Google’s webmaster tools without leaving WordPress.
Semrush Integration: Go to Yoast SEO → Integrations and enable the Semrush integration. Once connected, Yoast will show you related keyword suggestions directly inside your WordPress editor as you write — helping you naturally expand your content’s semantic coverage without switching between tools.
Final Thoughts
Learning how to set up Yoast SEO plugin in WordPress properly is one of the highest-return investments you can make for your website’s long-term success. Every setting you configure correctly removes a barrier between your content and Google’s rankings. Follow this guide step by step. Do not rush through the configuration. Pay attention to each individual post and page optimization because that is where the real ranking improvements happen — one piece of content at a time.
Once you successfully set up Yoast SEO plugin in WordPress using this guide, make it a habit to check your Yoast scores on every new piece of content before hitting publish. Aim for green across both SEO and Readability. Not because green means guaranteed rankings — but because it means you have done everything within your control to give Google every reason to rank you higher than your competitors.
Frequently Asked Questions (FAQs)
Q1: Is the free version of Yoast SEO enough for most websites?
Yes. The free version covers all essential SEO needs, including XML sitemaps, meta tags, schema markup, readability analysis, and social sharing optimization. Upgrade to Premium only if you need advanced features like AI title generation, redirect management, or internal link suggestions.
Q2: Should I use Yoast SEO or Rank Math in 2026?
Both are excellent plugins. Yoast SEO is more established with a larger user base and simpler interface — ideal for beginners. Rank Math offers more features in its free version. Either choice is fine — pick one and configure it properly rather than switching back and forth.
Q3: Does Yoast SEO slow down my WordPress website?
Yoast SEO adds minimal load to your website. Its impact on page speed is negligible when configured correctly. If page speed is a concern, focus on your hosting provider, image optimization, and caching plugin — these have far greater impact than Yoast.
Q4: What is a focus keyphrase in Yoast SEO?
A focus keyphrase is the main keyword or phrase you want a specific page to rank for in Google. Yoast analyzes your content and tells you whether you have used the keyphrase enough — in the title, introduction, headings, meta description, and body text.
Q5: How do I stop Yoast from indexing my tag pages?
Go to Yoast SEO → Settings → Taxonomies → Tags and set Show Tags in Search Results to Off. This adds a noindex tag to all tag pages, preventing Google from indexing them
Meta Description:
Learn how to set up the Yoast SEO plugin in WordPress step by step in 2026. Configure every setting correctly and start ranking higher on Google today.
- Why Yoast SEO Is the Best Choice for WordPress in 2026
- Step 1 — Install and Activate Yoast SEO
- Step 2 — Run the First-Time Configuration Wizard
- Step 3 — Configure the General Settings
- Step 4 — Set Up Content Types (Posts and Pages)
- Step 5 — Configure Categories and Tags
- Step 6 — Submit Your XML Sitemap to Google
- Step 7 — Optimize Every Post and Page Individually
- Step 8 — Configure the Advanced SEO Settings
- Step 9 — Set Up Breadcrumbs
- Step 10 — Connect Yoast to Google Search Console and Semrush
- Final Thoughts
- Frequently Asked Questions (FAQs)
- Meta Description: