

Your website tracking splits across five different Google Search Console properties because you never learned how to verify domain using DNS properly.
Understanding how to verify domain using DNS in Google Search Console solves this fragmentation problem completely. DNS verification creates a single domain property that automatically tracks all subdomains, all protocols (HTTP and HTTPS), and all URL variations under one unified dashboard—eliminating the confusion of managing multiple separate properties.
Most website owners avoid DNS verification because it seems technically complex compared to simpler HTML tag or file upload methods. However, DNS verification actually provides the most permanent, reliable verification method available. Once you verify domain using DNS in Google Search Console, your property remains verified even when you redesign your website, change hosting providers, or switch content management systems.
This comprehensive 2026 guide reveals exactly how to verify domain using DNS in Google Search Console with clear step-by-step instructions, platform-specific guidance for popular domain registrars, solutions for common verification errors, and expert tips that ensure successful setup on your first attempt.
Why Verify Domain Using DNS in Google Search Console?
Before diving into the technical process, understanding why DNS verification outperforms other methods clarifies its strategic advantages.
Complete Domain Coverage
When you verify domain using DNS in Google Search Console, you create a domain property that automatically includes every possible URL variation. This means https://www.example.com, https://example.com, http://www.example.com, blog.example.com, shop.example.com, and any other subdomain all report under one unified property. You get complete visibility without managing separate properties for each variation.
Permanent Verification Status
HTML tags disappear during theme changes. Verification files get deleted during site migrations. Google Analytics codes break when switching tracking implementations. DNS verification survives all these scenarios because the TXT record lives at the domain registrar level, completely independent of your website files or code.
No Website Code Changes Required
If you lack direct access to your website’s HTML files or your CMS makes adding code difficult, DNS verification bypasses these obstacles entirely. You work directly with your domain registrar’s DNS settings rather than editing website files—perfect for situations where you control the domain but not the website’s technical implementation.
Better for Complex Site Structures
Businesses running multiple subdomains for different purposes—blog.example.com for content, shop.example.com for eCommerce, support.example.com for help documentation—need domain properties to track everything comprehensively. DNS verification is the only method that creates domain properties rather than URL prefix properties.
Understanding DNS TXT Records
DNS (Domain Name System) TXT records store text information about your domain. When you verify domain using DNS in Google Search Console, you add a special TXT record containing a unique verification code that proves you control the domain’s DNS settings.
This verification code looks like: google-site-verification=1234567890abcdefghijklmnopqrstuvwxyz
Google periodically checks your domain’s DNS records for this verification code. As long as the TXT record remains in place, your domain property stays verified. The verification process doesn’t interfere with your website’s functionality—it simply adds metadata to your domain’s DNS configuration that Google reads but visitors never see.
Prerequisites Before You Start
Before attempting to verify domain using DNS in Google Search Console, ensure you have:
Google Account Access:
A Google account with permission to add properties in Google Search Console.
Domain Registrar Access:
Login credentials for the service where you purchased your domain (GoDaddy, Namecheap, Cloudflare, Google Domains, etc.). If you’re unsure who manages your domain, use a WHOIS lookup tool to find your registrar.
DNS Management Permissions:
Administrative access to modify DNS records. Some organizations restrict DNS editing to specific team members for security reasons.
Basic DNS Knowledge:
Understanding that DNS changes take time to propagate globally (typically 5-15 minutes, occasionally up to 48 hours).
Step-by-Step Guide: How to Verify Domain Using DNS
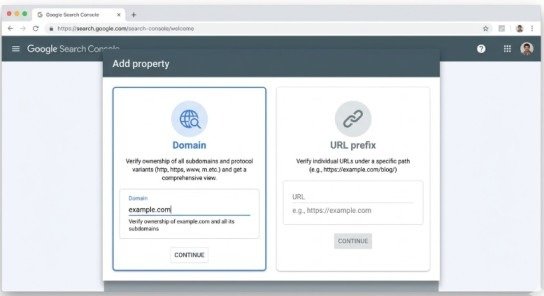
Step 1: Add Domain Property in Google Search Console
Navigate to search.google.com/search-console and sign in with your Google account.
Click “Add property” in the top-left corner or select the property dropdown and choose “Add property” at the bottom.
On the property selection screen, click “Domain” on the left side (not “URL prefix” on the right).
Enter your root domain without protocol or www—just type example.com, not https://www.example.com.
Click “Continue” to proceed to verification.
Important: Enter only the root domain. Don’t include https://, http://, www, or any subdomains. The domain property automatically covers all these variations.
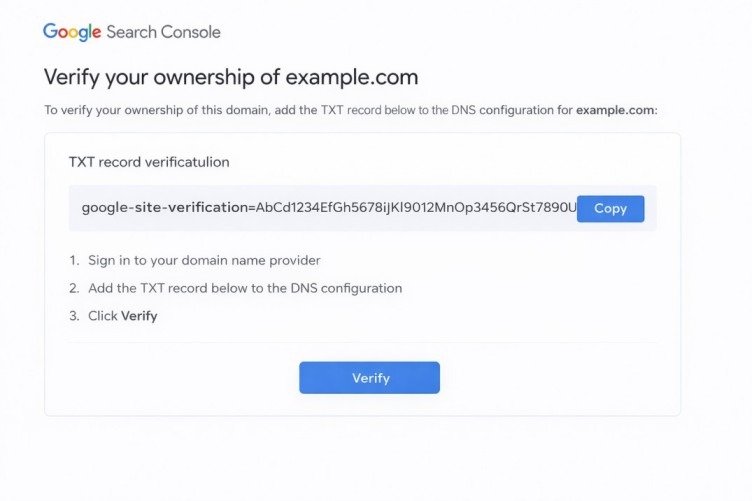
Step 2: Copy Your Unique TXT Verification Record
Google Search Console now displays your unique DNS verification screen with a TXT record that looks like:
google-site-verification=AbCd1234EfGh5678IjKl9012MnOp3456QrSt7890UvWx
Click the “Copy” button next to the TXT record to copy it to your clipboard. Keep this Google Search Console window open—you’ll need to return here after adding the DNS record.
Critical: This TXT record is unique to your Google account and this specific domain. Never share it publicly and never use TXT records from tutorials or examples—always use the code Google generates specifically for you.
Step 3: Access Your Domain Registrar’s DNS Management
Log into your domain registrar’s control panel. The exact location of DNS management varies by provider, but common navigation paths include:
GoDaddy: My Products > Domains > DNS Management Namecheap: Domain List > Manage > Advanced DNS Cloudflare: Select your domain > DNS Google Domains: My domains > Select domain > DNS Bluehost: Domains > Zone Editor HostGator: Domains > Zone Editor
Look for sections labeled “DNS Management,” “Zone Editor,” “DNS Records,” or “Nameserver Management.”
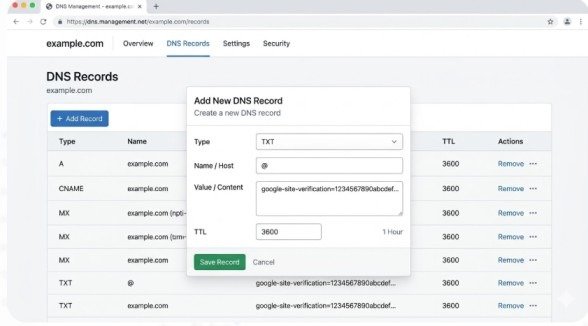
Step 4: Create New TXT Record
In your DNS management interface, locate the option to add a new record. This typically appears as “Add Record,” “Add DNS Record,” or a plus icon.
Configure the new TXT record with these settings:
Record Type: Select “TXT” from the dropdown menu
Name/Host: Enter “@” (this represents your root domain)
- Some registrars require leaving this field blank
- Others require your full domain name (example.com)
- Check your registrar’s documentation if unsure
Value/Data/Content: Paste the complete TXT record you copied from Google Search Console, including the entire google-site-verification= string
- Lower TTL values speed up future DNS changes but increase DNS query load
- The default value works perfectly for verification purposes
Click “Save,” “Add Record,” or your registrar’s equivalent button to create the TXT record.
Common mistake: Accidentally truncating the verification code when pasting. Verify the entire string copied correctly, including the google-site-verification= prefix.
Step 5: Wait for DNS Propagation
DNS changes don’t take effect instantly. Your new TXT record must propagate across global DNS servers before Google can detect it.
Typical propagation timelines:
- Minimum: 5-15 minutes for most registrars
- Average: 1-4 hours for widespread propagation
- Maximum: Up to 48 hours in rare cases
You can check DNS propagation status using online DNS lookup tools. Search for “DNS TXT lookup” and enter your domain to see if the TXT record appears globally.
Step 6: Verify in Google Search Console
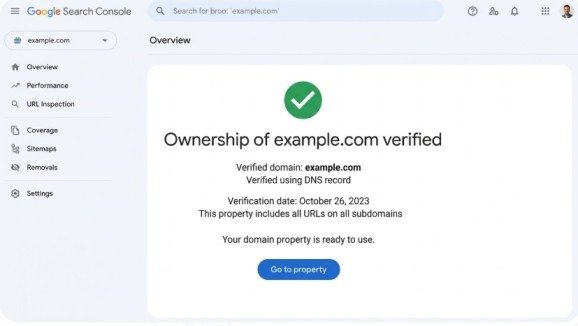
Return to the Google Search Console window where you copied the TXT record.
Click the blue “Verify” button at the bottom of the verification window.
If verification succeeds: You’ll see a green success message confirming domain ownership. You gain immediate access to your new domain property and can start using all Search Console features.
If verification fails: Google displays an error message. Common reasons include:
- DNS propagation not yet complete (wait 15 more minutes and try again)
- TXT record created in wrong location (subdomain instead of root domain)
- Incomplete TXT record value (missing characters when pasting)
- Using wrong verification code (must use code generated for your specific account)
Don’t panic if verification fails initially. DNS propagation timing varies significantly, and trying again after 30 minutes often succeeds.
Platform-Specific DNS Instructions
Different domain registrars have slightly different interfaces. Here are quick guides for popular platforms:
GoDaddy
- Navigate to DNS Management for your domain
- Click “Add” under the Records section
- Select “TXT” from Type dropdown
- Enter “@” for Name
- Paste verification code in Value field
- Keep default TTL
- Click “Save”
Cloudflare
- Select your domain from the dashboard
- Click “DNS” in the top navigation
- Click “Add record”
- Select “TXT” for Type
- Enter “@” for Name
- Paste verification code in Content field
- Keep “Auto” for TTL
- Click “Save”
Namecheap
- Click “Manage” next to your domain
- Navigate to “Advanced DNS” tab
- Click “Add New Record”
- Select “TXT Record” from Type dropdown
- Enter “@” for Host
- Paste verification code in Value field
- Keep default TTL
- Click the green checkmark to save
Troubleshooting Common Verification Errors
Error: “TXT Record Not Found”
Solution: DNS propagation incomplete. Wait 15-30 minutes and click “Verify” again. Check propagation using online DNS lookup tools.
Error: “Could Not Verify Your Ownership”
Solution: Verify you created the TXT record at the root domain (@) rather than a subdomain. Confirm the entire verification code copied correctly without truncation.
Error: Multiple Verification Attempts Failed
Solution: Check if your domain uses custom nameservers pointing to third-party DNS providers. You must add the TXT record wherever your nameservers point, not necessarily at your domain registrar.
Verification Succeeds But Data Doesn’t Appear
Solution: Normal behavior. New domain properties take 24-48 hours to populate initial data. Google needs time to crawl your site and collect search performance information.
Best Practices After Successful Verification
Once you successfully verify domain using DNS in Google Search Console, follow these best practices:
Never Remove the TXT Record:
Keep your verification TXT record in your DNS settings permanently. Removing it causes verification to fail, potentially losing property access.
Add Multiple Verification Methods:
Create backup verification using HTML tag or Google Analytics methods. This ensures continued access if DNS records accidentally change.
Submit XML Sitemap:
In your new domain property, navigate to Sitemaps and submit your sitemap URL (typically yoursite.com/sitemap.xml) to help Google discover your pages faster.
Enable Email Notifications:
Configure Search Console to send email alerts about critical issues like indexing problems, manual actions, or security issues.
Document Your Setup:
Record which Google account owns the property and where the DNS TXT record exists. This documentation helps future administrators maintain access.
Conclusion
Learning how to verify domain using DNS in Google Search Console provides the most comprehensive, permanent verification method available. This approach creates a single domain property tracking all your subdomains and protocol variations under one unified dashboard—eliminating the confusion of managing multiple separate properties.
The process requires accessing your domain registrar’s DNS management interface, creating a new TXT record with your unique verification code, waiting for DNS propagation, and confirming verification in Google Search Console. While slightly more technical than HTML tag methods, DNS verification delivers superior long-term reliability because it operates independently of your website’s code or files.
Start this week. Access your domain registrar’s control panel, follow these step-by-step instructions to verify domain using DNS in Google Search Console, and gain the complete visibility into your search performance that fragmented URL prefix properties cannot provide. Your consolidated domain property awaits, ready to deliver the unified analytics your SEO strategy needs to succeed.
Frequently Asked Questions
How long does DNS verification take?
DNS propagation typically takes 15 minutes to 4 hours. Google recommends waiting at least 15 minutes after adding the TXT record before clicking “Verify.” In rare cases, propagation can take up to 48 hours.
Can I verify multiple domains with the same Google account?
Yes. Each domain requires its own unique TXT record, but one Google Search Console account can manage up to 1,000 verified properties.
What happens if I change domain registrars?
Transfer your DNS records, including the Google verification TXT record, to your new registrar. If you forget to transfer it, your domain property becomes unverified and you’ll need to verify again with a new TXT record.
Do I need to reverify periodically?
No. As long as the TXT record remains in your DNS settings, verification persists indefinitely. Google automatically checks for the record periodically to confirm continued ownership.
Can DNS verification work for subdomains?
Domain property verification covers all subdomains automatically. If you want to verify a subdomain independently, create a URL prefix property instead and use HTML tag or file upload verification.
Meta Description:
Learn how to verify domain using DNS in Google Search Console! Complete 2026 step-by-step guide with TXT record setup, common errors, and expert troubleshooting tips.
- Why Verify Domain Using DNS in Google Search Console?
- Prerequisites Before You Start
- Step-by-Step Guide: How to Verify Domain Using DNS
- Step 4: Create New TXT Record
- Step 5: Wait for DNS Propagation
- Step 6: Verify in Google Search Console
- Platform-Specific DNS Instructions
- Troubleshooting Common Verification Errors
- Best Practices After Successful Verification
- Conclusion
- Frequently Asked Questions
- Meta Description: