
You installed Flutter SDK successfully but you’re completely stuck trying to create a new Flutter project because every tutorial assumes you already know which IDE to use and how project creation commands actually work.
Learning how to create a new Flutter project is the essential first step toward building cross-platform mobile applications for Android, iOS, web, and desktop. Without understanding proper project initialization, you cannot write code, test applications, or deploy apps to devices. Flutter offers multiple project creation methods through VS Code, Android Studio, and command-line interfaces—each suited to different developer preferences and workflows.
Most beginners download Flutter, open VS Code or Android Studio, then panic when facing unfamiliar menus, project templates, and configuration options. They randomly click buttons hoping something works, create projects in wrong directories, skip crucial naming conventions, or generate projects missing essential dependencies. This confused approach wastes hours debugging self-created problems when following proper procedures takes just five minutes.
This comprehensive 2026 guide reveals exactly how to create a new Flutter project using three different methods, explains the generated project structure and what each directory contains, demonstrates proper naming conventions that prevent common errors, and provides practical next steps that transform your empty project into a functional application ready for development.
Prerequisites Before Creating Your Project
Before attempting to create a new Flutter project, ensure you completed Flutter SDK installation and environment setup correctly.
Verify Flutter Installation
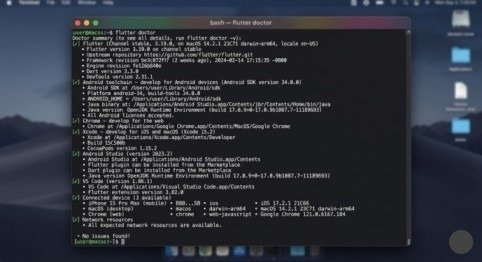
Open your terminal or command prompt and run:
flutter doctor
This command checks your Flutter installation and displays any missing dependencies. You should see checkmarks (✓) next to Flutter, Connected Devices, and your chosen IDE (VS Code or Android Studio). Any warnings with [!] symbols require attention before proceeding.
Install Required Tools
For Android Development: Install Android Studio which includes Android SDK, Android emulators, and build tools.
For iOS Development (macOS only): Install Xcode from the Mac App Store for iOS simulators and build tools.
For Desktop/Web Development: Flutter 3.x supports Windows, macOS, Linux, and web development out of the box.
Method 1: Create New Flutter Project Using VS Code
VS Code combined with the Flutter extension offers the simplest project creation experience for beginners.
Installing Flutter Extension
Open VS Code and click the Extensions icon in the left sidebar (or press Ctrl+Shift+X). Search for “Flutter” and install the official Flutter extension published by Dart Code. This automatically installs the Dart extension as a dependency.
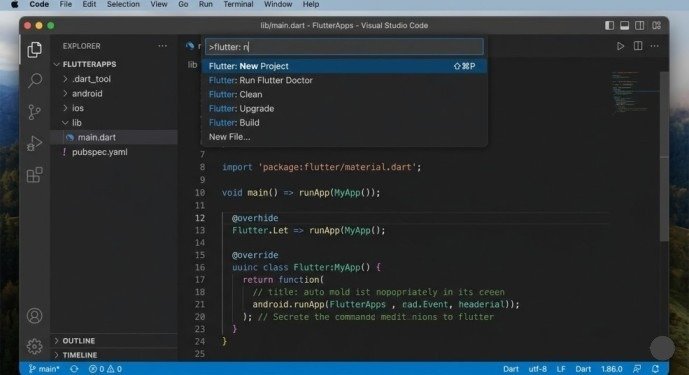
Creating Project Through Command Palette
Press F1 or Ctrl+Shift+P (Cmd+Shift+P on Mac) to open the Command Palette. Type “flutter new” and select Flutter: New Project from the dropdown.
VS Code displays project template options:
Application:
Standard Flutter app with UI and full functionality. Choose this for most projects.
Plugin:
Creates a plugin package for sharing platform-specific code.
Package:
Creates a pure Dart package for sharing Dart code.
Skeleton:
Minimal template with basic structure.
Select Application for your first project. VS Code prompts you to select a parent directory where your project will be created.
Important:
Don’t create the project folder yourself—Flutter creates it automatically. Select an existing parent directory like Documents or a dedicated code folder.
Enter your project name when prompted. Use lowercase letters with underscores separating words, following Dart naming conventions: my_first_app, todo_list_app, or weather_dashboard. Never use hyphens, spaces, or capital letters in project names—these cause build errors.
Flutter creates your project and opens it in a new VS Code window. The entire process takes 30-60 seconds depending on your internet connection as Flutter downloads dependencies.
Method 2: Create New Flutter Project Using Android Studio
Android Studio provides a visual wizard interface that many developers find more intuitive than command-line tools.
Starting the Project Wizard
Open Android Studio. If you see the welcome screen, click New Flutter Project. If you already have a project open, navigate to File > New > New Flutter Project.
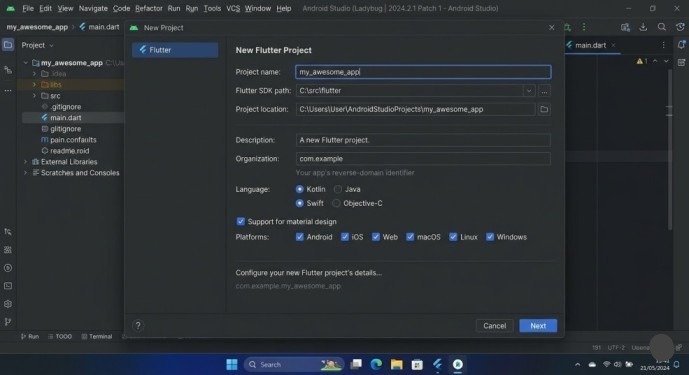
The New Project dialog appears. Under Generators in the left panel, ensure Flutter is selected. Verify the Flutter SDK path in the right panel points to your actual Flutter installation directory. If incorrect, click the folder icon to browse and select the correct path.
Click Next to proceed to project configuration.
Configuring Project Settings
Project name:
Enter your app name using lowercase_with_underscores convention. Android Studio validates naming in real-time and shows errors for invalid characters.
Project type:
Keep “Application” selected unless creating a plugin or package.
Project location:
Specify where Flutter creates your project directory. The tool creates a folder matching your project name inside this location.
Organization:
Enter your reverse domain name like com.yourcompany or com.yourdomain. This becomes your app’s package identifier on Android and bundle identifier on iOS. Use your actual domain if you plan to publish the app.
Android language:
Choose Kotlin (recommended) or Java.
iOS language:
Choose Swift (recommended) or Objective-C.
Platforms:
Check which platforms you want to support—Android, iOS, Web, Windows, macOS, Linux. You can add platforms later.
Click Finish to create your project. Android Studio generates the project structure, downloads dependencies, and opens your new project workspace.
Method 3: Create New Flutter Project Using Command Line
The command-line approach offers maximum control and works identically across all operating systems.
Basic Project Creation Command
Open your terminal or command prompt, navigate to the directory where you want to create projects, then run:
flutter create my_app_name
Replace my_app_name with your desired project name following the lowercase_with_underscores convention.
Flutter creates a complete project structure with all necessary files and directories. The process takes 30-60 seconds.
Advanced Creation Options
Specify organization identifier:
flutter create –org com.yourcompany my_app_name
Create minimal “empty” template:
flutter create –empty my_app_name
The empty template generates minimal boilerplate, ideal for experienced developers who want maximum control.
Specify platforms:
flutter create –platforms=android,ios,web my_app_name
This creates a project supporting only the specified platforms, reducing project size.
Understanding the Generated Project Structure
After successfully creating a new Flutter project, understanding the generated directory structure helps you navigate and modify your application effectively.
Key Directories and Files
lib/: Contains all your Dart source code. The main.dart file inside is your app’s entry point where execution begins.
android/: Platform-specific Android configuration and build files. Modify this for Android-specific features.
ios/: Platform-specific iOS configuration and build files. Modify this for iOS-specific features.
test/: Contains unit tests and widget tests for your application.
pubspec.yaml: Project configuration file listing dependencies, assets, and metadata. This is where you add third-party packages.
assets/: Create this directory manually to store images, fonts, and other static files your app needs.
.dart_tool/: Contains build system and tool configuration. Never modify manually.
build/: Contains compiled application output. Excluded from version control.
Running Your Newly Created Project
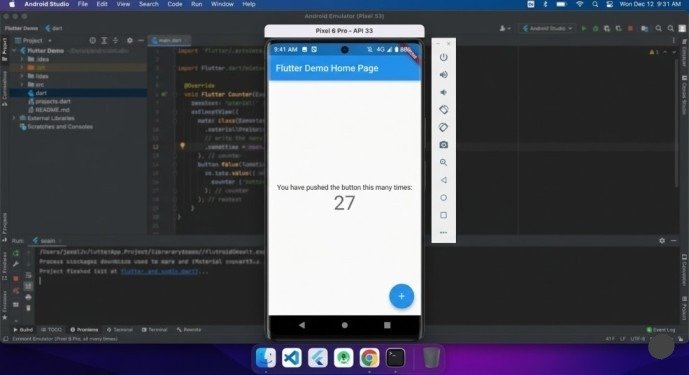
Verify your new project works by running it on an available device or emulator.
Starting an Emulator
Android:
Launch Android Studio, click Tools > Device Manager, then start an emulator.
iOS (macOS only):
Open Xcode, select Xcode > Open Developer Tool > Simulator.
Chrome (for web):
Simply have Google Chrome installed.
Running the Application
In VS Code:
Press F5 or click Run > Start Debugging. VS Code detects available devices and prompts you to select one.
In Android Studio:
Click the device dropdown at the top, select your target, then click the green play button.
Via Command Line:
Navigate to your project directory and run:
flutter run
Flutter compiles and launches your app on the selected device. The initial build takes several minutes, but subsequent hot reloads happen in seconds.
Customizing Your New Project
After running the default template successfully, customize it to understand how Flutter apps work.
Modifying the App Title
Open lib/main.dart and find the MaterialApp widget. Change the title property:
MaterialApp(
title: ‘My Custom App’,
// …
)
Changing the Home Page Text
Locate the MyHomePage class and modify the text in the AppBar:
AppBar(
title: Text(‘Welcome to My App’),
)
Save your changes and press r in the terminal (or use the hot reload button in your IDE) to see changes instantly without restarting the app. This hot reload feature makes Flutter development exceptionally fast.
Common Project Creation Errors
Invalid Project Name Error
Flutter rejects project names containing capital letters, hyphens, or spaces. Use only lowercase letters, numbers, and underscores. Invalid: MyApp, my-app, my app. Valid: my_app, my_first_app, todo_app_2026.
Flutter SDK Not Found
If project creation fails with “Flutter SDK not found,” your PATH environment variable doesn’t include Flutter. Re-run Flutter installation setup scripts or manually add Flutter’s bin directory to your system PATH.
Permission Denied Errors
On macOS/Linux, ensure you have write permissions in the directory where you’re creating projects. Use your home directory or Documents folder to avoid permission problems.
Next Steps After Project Creation
With your new Flutter project created successfully, progress through these learning milestones:
Explore the Widget Catalog:
Experiment with Flutter’s built-in widgets—Text, Container, Row, Column, Image, and Button.
Add Dependencies:
Learn to add packages from pub.dev by modifying pubspec.yaml, then running flutter pub get.
Build Simple UIs:
Create multiple screens, add navigation between them, and understand stateful vs stateless widgets.
Connect to APIs:
Fetch data from REST APIs using the http package and display it in your app.
Implement State Management:
Learn Provider, Riverpod, or Bloc for managing application state as complexity grows.
Conclusion
Learning how to create a new Flutter project through VS Code, Android Studio, or command-line interfaces establishes your foundation for cross-platform app development. The process involves selecting appropriate project templates, following lowercase_with_underscores naming conventions, configuring platform targets, and understanding the generated directory structure that organizes your application code.
Whether you prefer VS Code’s Command Palette simplicity, Android Studio’s visual wizard, or command-line control with flutter create, all methods produce identical project structures ready for development. The generated template includes a working demo app you can run immediately to verify installation success.
Start this week. Open your preferred development environment, create a new Flutter project following this guide, run it on an emulator or physical device to see the default counter app, then modify the text and colors to understand hot reload’s instant feedback. This hands-on experimentation transforms theoretical knowledge into practical Flutter development skills.
Your journey from creating a new Flutter project to publishing production applications on app stores begins with executing flutter create my_first_app or clicking New Flutter Project in your IDE. Take that step today.
Frequently Asked Questions
Can I create Flutter projects without an IDE?
Yes. The command-line flutter create command works perfectly and many developers prefer it. IDEs just provide visual interfaces for the same underlying command.
How many Flutter projects can I create?
Unlimited. Each project exists independently in its own directory with no restrictions on total project count.
Can I rename a Flutter project after creation?
Renaming requires changing multiple configuration files across Android, iOS, and project metadata. It’s easier to create a new project with the correct name.
What’s the minimum Flutter version needed?
As of 2026, Flutter 3.x is required for full platform support. Check with flutter –version and upgrade if necessary using flutter upgrade.
Do I need different projects for Android and iOS?
No. Flutter’s power lies in cross-platform development. One project generates apps for Android, iOS, web, and desktop simultaneously.
Meta Description
Learn how to create a new Flutter project step-by-step! Complete 2026 beginner’s guide with VS Code, Android Studio, command line methods, and project structure explained.