
Do you want to run your Flutter app without a real phone? Good news — you can do it easily. You just need an emulator. It works like a real phone inside your computer, allowing you to test apps anytime without extra hardware.
In today’s fast digital world, developers need quick and reliable testing tools. Therefore, using an emulator is one of the smartest choices. It not only saves time but also removes the hassle of connecting and managing physical devices again and again. As a result, your workflow becomes smoother and more efficient.
Moreover, if you are new to Flutter development, this guide is perfect for you. It explains everything in a simple way so you can follow along without confusion. By the end, you will know how to create, run, optimize, and manage an Android Virtual Device like a professional developer.
What is an Android Virtual Device?
An Android Virtual Device is a software-based mobile device that runs on your computer. It is created using Android Studio and behaves exactly like a real Android phone or tablet.
In simple terms, it allows you to install apps, test features, and explore different Android environments without owning multiple devices. For example, you can test your app on different screen sizes, resolutions, and Android versions within minutes.
Because of this flexibility, developers rely heavily on this virtual setup during app development. It helps them identify bugs early and improve app performance before launching it to real users.
Why Use Android Virtual Device for Flutter?
Using an Android Virtual Device offers many advantages, especially for Flutter developers who need fast testing environments. It reduces dependency on physical devices and makes the development process more flexible.
One major benefit is convenience. You can start testing your app instantly without plugging in a phone. In addition, switching between different devices becomes very easy, which helps you check how your app behaves in multiple scenarios.
Another important reason is cost efficiency. Instead of buying different Android phones, you can simulate them all using this setup. This makes it a perfect choice for beginners and professionals alike.
Also, Flutter integrates smoothly with Android Studio, which means your emulator will work seamlessly with your apps. This creates a powerful development environment that saves both time and effort.
Things You Need Before Creating AVD
Before creating an Android Virtual Device, it is important to prepare your system properly. Without the right setup, you may face issues later.
First, make sure that Flutter SDK is installed and working correctly. Then, install Android Studio, which is required to create and manage your virtual device. Along with that, you need Android SDK tools and a stable internet connection to download system images.
Additionally, enabling virtualization on your computer can improve emulator performance significantly. This small step can make a big difference in speed and smoothness.
Once everything is ready, you can move forward and create your Android Virtual Device without any problems.
Step-by-Step Guide to Create Android Virtual Device
Now, let’s create your first Android Virtual Device for Flutter.
Step 1: Open Android Studio
First, open Android Studio on your computer.
Then, go to:
More Actions → Device Manager
Or, if a project is open:
Tools → Device Manager
Step 2: Click on Create Device
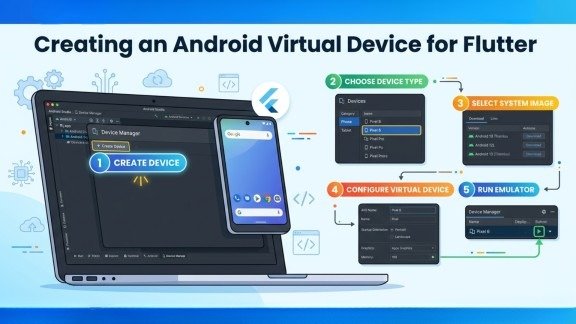
Next, click the “Create Device” button.
After that, a new window will open. It will show different device types.
Step 3: Choose Device Type
Now, select a device. For example:
Pixel 4
Pixel 6
Any phone or tablet
It is better to choose a Pixel device because it works smoothly with an Android Virtual Device.
Then click Next.
Step 4: Select System Image
Now, you need to choose an Android version.
For best results:
Choose the latest API level
Select an image with Google APIs
If not downloaded, click the download icon.
This step is important because your Android Virtual Device runs on this system.
Step 5: Configure Virtual Device
Here, you can change settings like:
Device name
RAM
Storage
Graphics
However, default settings are fine for beginners.
Then click Finish.
Step 6: Run the Emulator
Now your Android Virtual Device is ready.
Click the Play (Run) button to start it.
After a few seconds, your virtual phone will open.
How to Run a Flutter App on an Android Virtual Device
Once your Android Virtual Device is running, the next step is to run your Flutter app on it. This process is very simple and only takes a few commands.
First, open your Flutter project in your preferred editor. Then open the terminal and check connected devices using the flutter devices command. If your emulator appears in the list, it means everything is set up correctly. After that, run the command flutter run. Your application will start building and then launch directly on the emulator. Within a few seconds, you will see your app running just like it would on a real phone.
Best Settings for Better Performance
Sometimes, the emulator may feel slow, especially on low-end systems. However, you can improve performance by adjusting a few important settings.
For example, enabling hardware acceleration allows your computer’s CPU and GPU to handle tasks more efficiently. In addition, using compatible system images like x86 can significantly boost speed.
Increasing RAM allocation also helps the Android Virtual Device run smoothly. If your system supports it, using SSD storage instead of HDD can further enhance performance.
With these improvements, your emulator will run faster and provide a better development experience.
Common Problems and Solutions
Even though creating an Android Virtual Device is simple, you may still face some common issues. The good thing is that most of them are easy to fix.
If the emulator does not start, it is often due to disabled virtualization. Enabling it from BIOS settings usually solves the problem. Sometimes, simply restarting Android Studio can also fix startup issues.
Another common problem is when Flutter does not detect the device. In this case, running flutter doctor helps identify missing components or errors. Fixing those issues will make your Android Virtual Device visible again.
Performance issues can also occur, especially if your system resources are limited. Closing background applications and using hardware graphics can improve speed.
How to Manage Android Virtual Device
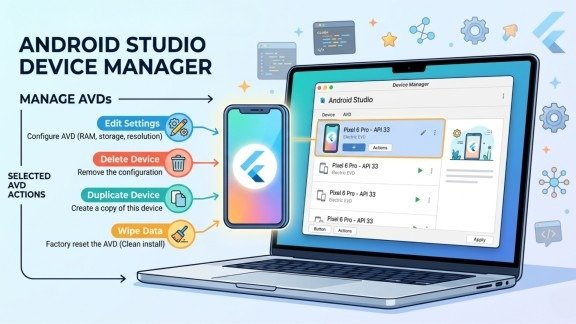
Managing your Android Virtual Device is just as important as creating it. Android Studio provides simple tools to handle everything easily.
You can edit your virtual device settings whenever needed. For example, you can change RAM, storage, or screen resolution. If a device is no longer needed, you can delete it to free up space.
In addition, you can duplicate an existing Android Virtual Device to create a similar setup quickly. If your emulator starts behaving incorrectly, wiping its data resets it to a fresh state.
These features help you maintain an organized and efficient development environment.
Advanced Tips for Developers
Once you are comfortable with the basics, you can explore advanced techniques to get more out of your Android Virtual Device.
For instance, using multiple virtual devices allows you to test your app on different configurations at the same time. This is especially useful for ensuring compatibility across various Android versions.
You can also simulate different network conditions and device behaviors to test how your app performs in real-world situations. These advanced practices help improve app quality and user experience significantly.
Android Virtual Device vs Real Device
Both virtual and real devices play an important role in app development. However, they serve different purposes.
An Android Virtual Device is ideal for quick testing and debugging. It is easy to use, cost-effective, and highly flexible. On the other hand, a real device provides accurate performance and real-world behavior.
Therefore, it is best to use an Android Virtual Device during development and switch to a real device for final testing. This balanced approach ensures better results.
Final Thoughts
Creating an Android Virtual Device for Flutter is simple, yet extremely powerful. It allows developers to test apps quickly without relying on physical devices.
Moreover, it improves productivity and makes the development process more flexible. Whether you are a beginner or an experienced developer, using this setup can make your workflow much easier.
If you follow this guide carefully, you will be able to create, run, and manage your emulator without any issues. Now, you are fully ready to build, test, and launch your Flutter applications with confidence .
FAQs
What is an Android Virtual Device in Flutter?
An Android Virtual Device is a virtual mobile emulator that lets you run and test Flutter apps on your computer without a real phone.
How do I create an Android Virtual Device for Flutter?
You can create an Android Virtual Device through Android Studio Device Manager by selecting a device, choosing a system image, and completing the setup.
Why use an Android Virtual Device for Flutter development?
An Android Virtual Device allows quick testing, easy device switching, and smooth development without relying on physical devices.
Why is my Android Virtual Device running slow?
Slow performance usually happens due to low RAM, disabled hardware acceleration, or using heavy system images.
How to fix Android Virtual Device not detected in Flutter?
Run flutter doctor, check SDK setup, and ensure your emulator is properly installed and running to resolve detection issues.
Meta Description
Learn how to create an Android Virtual Device for Flutter with this easy step-by-step guide. Set up emulator, improve performance, and run Flutter apps smoothly.