

Your newly published article shows zero impressions in Search Console because Google hasn’t indexed it yet—and you only discovered this three weeks later when you finally checked the URL Inspection Tool.
Learning how to use URL Inspection Tool in Google Search Console prevents these costly delays. This powerful diagnostic feature shows exactly what Google sees when crawling your pages, reveals why pages aren’t indexed, displays rendering problems invisible in browsers, and provides instant indexing requests that bypass normal crawling schedules. Without regularly using this tool, you operate blind to critical indexing failures that silently destroy traffic potential.
Most website owners publish content, assume Google automatically finds and indexes everything, then discover weeks later that important pages never entered the search index. The URL Inspection Tool transforms this reactive approach into proactive monitoring—you verify indexation immediately after publishing, diagnose problems before they compound, and request priority crawling for time-sensitive content.
This comprehensive 2026 guide reveals how to use URL Inspection Tool in Google Search Console with step-by-step instructions for every feature, practical guidance for interpreting each status message, proven troubleshooting methods for common indexing failures, and expert strategies that accelerate your content’s appearance in search results.
What Is the URL Inspection Tool?
The URL Inspection Tool in Google Search Console provides detailed diagnostics about how Google discovers, crawls, and indexes individual URLs on your website. Unlike aggregate reports showing property-wide statistics, this tool delivers URL-specific insights that pinpoint exactly why a particular page succeeds or fails in Google’s indexing process.
The tool operates in two distinct modes that serve different diagnostic purposes:
Indexed Version Analysis:
Shows what Google currently has stored in its index from the last successful crawl. This historical view reveals the page state Google used for ranking decisions, including the HTML it received, any crawling problems it encountered, and which canonical URL it selected.
Live URL Testing:
Performs real-time crawling and rendering of your current page version. This immediate test validates fixes you just implemented, confirms whether Google can access updated content, and shows how Google renders JavaScript-heavy pages before committing resources to full indexation.
Why the URL Inspection Tool Matters for SEO
Why the URL Inspection Tool Matters for SEO
In 2026, the URL Inspection Tool carries exceptional importance for three critical reasons that make it indispensable for effective SEO management.
Immediate Indexing Verification
Publishing valuable content means nothing if Google never indexes it. The URL Inspection Tool lets you verify indexation status immediately after publishing rather than waiting days or weeks to discover problems through traffic reports. This proactive approach catches noindex tags left active by mistake, robots.txt blocks accidentally covering new sections, and canonical misconfigurations before they accumulate into major visibility losses.
JavaScript Rendering Diagnostics
Modern websites heavily utilize JavaScript frameworks that render content after initial page load. Google must execute this JavaScript to see your actual content, and rendering failures create invisible problems—pages appear perfect in browsers but show empty content to Google. The URL Inspection Tool’s screenshot feature reveals these rendering failures immediately, showing exactly what Google sees after JavaScript execution completes.
Mobile-First Indexing Validation
Google uses your mobile page version as the primary source for indexing and ranking decisions. Desktop pages that work flawlessly sometimes fail mobile usability requirements or render differently on mobile devices. The URL Inspection Tool shows whether Google crawled your page as mobile or desktop and highlights mobile-specific problems preventing successful indexation.
How to Access the URL Inspection Tool
Method 1: Direct URL Entry
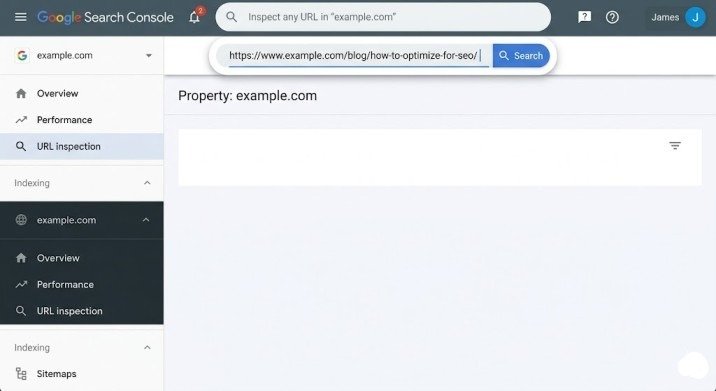
Navigate to Google Search Console and locate the search bar at the very top of the interface displaying “Inspect any URL in [your property].” Enter the complete URL you want to inspect—including the https:// protocol and exact path—then press Enter. Google immediately retrieves indexation data for that specific URL and displays comprehensive diagnostic information.
This method works perfectly when you know the exact URL requiring inspection and want immediate results without navigating through multiple interface screens.
Method 2: Pages Report Integration
Navigate to the Pages report under Indexing in the left sidebar. This report groups URLs by indexation status—indexed pages, excluded pages, and specific exclusion reasons. Click any status category to see affected URLs, then click individual URLs in the list to open their detailed inspection reports.
This method excels when investigating systematic problems affecting multiple pages sharing common characteristics rather than diagnosing single isolated URLs.
Understanding URL Inspection Tool Results
When you inspect a URL, Google displays several critical sections that each reveal different diagnostic information.
Presence on Google Status
This primary status indicator appears prominently at the top and communicates Google’s fundamental decision about whether the URL can appear in search results. Understanding each possible status determines appropriate action.
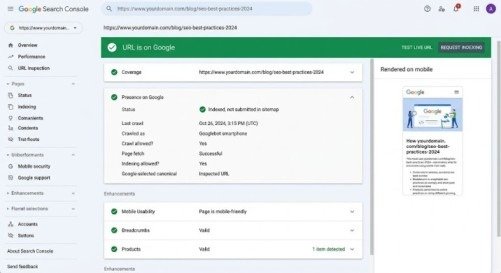
URL is on Google:
Your page successfully passed crawling and indexing evaluation. It can appear in search results for relevant queries. This represents the ideal status for all important content. No action required unless the page isn’t ranking—in which case, focus on content quality improvements, internal linking, and backlink acquisition.
URL is on Google, but has issues:
Google indexed your page but detected problems with enhancements like schema markup or mobile usability. The page can still rank, but certain rich result features may not display properly. Investigate the specific issues listed in the Enhancements section and fix problems that actually impact user experience or rich result eligibility.
URL is not on Google:
Google deliberately excluded your page from the index, typically because you blocked crawling through robots.txt, implemented noindex directives, or protected the page with authentication. Review the Coverage section to identify the specific exclusion reason, then remove blocks if you want the page indexed.
URL is not on Google: Indexing errors:
Google attempted to index your page but encountered technical errors preventing success. Common causes include server errors returning 5xx status codes, DNS failures, or timeout problems. Fix the underlying technical issue causing the error, then request re-indexing.
Coverage Section Details
The Coverage section breaks down Google’s indexing process into three sequential phases—Discovery, Crawl, and Indexing—with specific diagnostic information for each phase.
Discovery Phase:
Shows how Google initially learned about your URL. This includes which XML sitemap contains the URL and which referring pages linked to it. If no sitemap is listed, ensure you submitted a sitemap containing this URL. If no referring page appears, the page may lack sufficient internal linking.
Crawl Phase:
Details the last successful crawl attempt. Key fields include the last crawl date, which user-agent Google used (typically Googlebot Smartphone for mobile-first indexing), whether crawling was allowed, and the page fetch result. Failed fetches indicate technical problems requiring immediate attention.
Indexing Phase:
Reveals canonical URL decisions. Google shows both your declared canonical tag and the canonical it selected. When these differ, Google ignored your preference—investigate why it chose a different canonical and whether that selection makes sense for your content strategy.
Enhancements Section
The Enhancements section reports problems with mobile usability and structured data implementation. Mobile usability issues like “Text too small to read” or “Clickable elements too close together” prevent positive mobile experiences and can impact mobile rankings. Fix these problems to ensure mobile visitors and Google both see properly formatted content.
Schema markup warnings appear here when Google detects missing recommended fields or invalid implementations. Some warnings don’t prevent rich results from displaying—evaluate whether fixing each warning provides actual user or SEO benefit before investing development resources.
Using the Live URL Test Feature
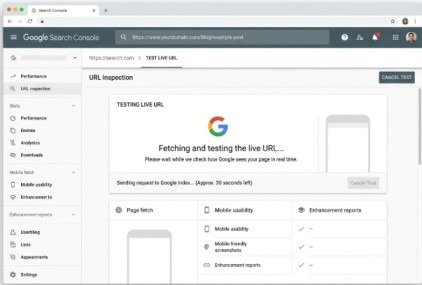
After implementing fixes or publishing new content, you need immediate validation without waiting days for Google to naturally recrawl your pages. The Live URL Test feature provides this instant feedback.
Click “Test Live URL” on the right side of the inspection results. Google performs real-time crawling and rendering of your current page version, showing results within 1-2 minutes. This live test reveals whether Google can now access content it previously couldn’t, validates that fixes resolved reported problems, and shows how Google renders your current JavaScript execution.
Critical limitation:
The live test doesn’t check whether Google will ultimately choose your URL as canonical or whether manual actions or removal requests affect it. It strictly answers whether Google can technically crawl and render the current page state.
The View Tested Page feature within live test results shows three valuable diagnostic tabs:
HTML Tab:
Displays the complete rendered HTML Google received after JavaScript execution. Compare this to your intended content to spot rendering failures where JavaScript fails to populate content Google needs to see.
Screenshot Tab:
Shows how your page visually appeared to Google after rendering completed. Visual problems invisible in the HTML become immediately obvious in screenshots—missing images, broken layouts, or content positioned outside viewable areas .More Info Tab: Lists HTTP response codes, headers including X-Robots-Tag directives, loaded and failed page resources, and JavaScript console errors. Failed resource loads or JavaScript errors often explain rendering problems and content accessibility failures
How to Request Indexing
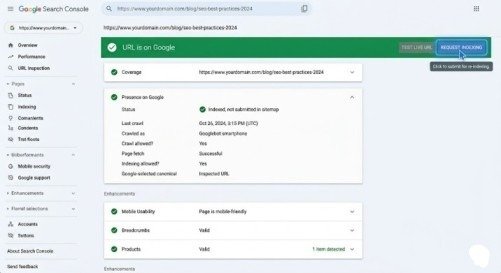
When you’ve published new content or fixed problems on existing pages, you want Google to discover changes immediately rather than waiting for natural crawling schedules. The URL Inspection Tool provides this acceleration through its Request Indexing feature.
After inspecting a URL, click the “Request Indexing” button. Google adds your URL to a priority crawling queue. While indexing isn’t guaranteed or instant, most requested URLs get crawled within hours rather than days or weeks. This feature proves especially valuable for time-sensitive content like news articles, limited-time offers, or competitive response content.
Important limitation:
Google limits indexing requests to approximately 10-12 per day per property. Reserve requests for genuinely important URLs rather than requesting indexing for every minor page update. Exceeding rate limits results in temporary blocking from submitting additional requests.
Common Issues and Solutions
Issue: URL Shows “Discovered – Currently Not Indexed”
Diagnosis:
Google found your URL but decided it doesn’t merit indexing, typically due to quality concerns or lack of unique value compared to existing indexed content.
Solution:
Substantially expand content with unique insights, strengthen internal linking from high-authority pages, acquire external backlinks signaling value, or consolidate multiple thin pages into comprehensive resources.
Issue: Live Test Shows Different Status Than Indexed Version
Diagnosis:
You implemented fixes or changes that Google hasn’t yet discovered through natural crawling.
Solution:
Use the Request Indexing feature to accelerate discovery of your improvements. Google will recrawl and update its indexed version, bringing the live test and indexed version into alignment.
Issue: Screenshot Shows Missing or Broken Content
Diagnosis:
JavaScript rendering failures prevent Google from seeing content that displays correctly in browsers.
Solution:
Check the More Info tab for JavaScript console errors and failed resource loads. Fix these technical problems, eliminate render-blocking resources, or implement server-side rendering for critical content.
Best Practices for URL Inspection Tool Usage
Inspect every newly published important page within 24 hours of publication to confirm successful indexation. Request indexing immediately for time-sensitive content requiring rapid appearance in search results.
Create a systematic audit schedule—inspect your highest-traffic pages monthly to catch degradation in indexation status, mobile usability problems, or schema markup errors that gradually develop over time.
Document inspection results for pages with chronic problems. Screenshot the Coverage and Enhancements sections to track whether issues persist across multiple inspections or successfully resolve after fixes.
Compare indexed version results with live test results systematically. When these diverge significantly, the indexed version represents what Google uses for ranking decisions—update it through indexing requests rather than assuming live test results reflect your current search visibility.
Conclusion
Learning how to use URL Inspection Tool in Google Search Console transforms passive hoping into active verification. This diagnostic powerhouse reveals exactly what Google sees when crawling your pages, identifies specific technical problems preventing indexation, validates fixes through live testing, and accelerates discovery through indexing requests.
The workflow is straightforward—enter your URL, review Presence on Google status, investigate Coverage details, check Enhancements for problems, run live tests after fixes, and request indexing for important updates. Each inspection takes under two minutes but prevents weeks of lost traffic from undiscovered indexation failures.
Start this week. Open Google Search Console, inspect your ten most important pages, verify their indexation status, fix any discovered problems, and establish a systematic inspection routine. The URL Inspection Tool provides the visibility you need to ensure Google successfully indexes every page that deserves search visibility.
Frequently Asked Questions
How often should I use the URL Inspection Tool?
Inspect every newly published important page within 24 hours. For established content, monthly inspections of high-value pages catch developing problems early.
Why does my URL show as indexed but isn’t ranking?
Indexation doesn’t guarantee rankings. Focus on content quality, internal linking, backlinks, and user experience improvements to achieve actual ranking positions.
Can I request indexing for multiple URLs simultaneously?
No. The URL Inspection Tool only processes one URL at a time. For bulk indexing requests, submit comprehensive XML sitemaps instead.
How long does Request Indexing take to work?
Most URLs get crawled within hours to 2-3 days after indexing requests. However, crawling doesn’t guarantee indexation—quality evaluation still determines final inclusion.
Meta Description
Learn how to use URL Inspection Tool in Google Search Console! Complete 2026 step-by-step guide with live testing, indexing requests, and troubleshooting tips.
- What Is the URL Inspection Tool?
- Why the URL Inspection Tool Matters for SEO
- How to Access the URL Inspection Tool
- Understanding URL Inspection Tool Results
- Using the Live URL Test Feature
- How to Request Indexing
- Common Issues and Solutions
- Best Practices for URL Inspection Tool Usage
- Conclusion
- Frequently Asked Questions
- Meta Description