
You built a great website but Google has no idea it exists because you never officially submitted it to Google Search Console.
Learning how to submit website to Google Search Console is the first essential step in making your site visible in search results. Without this setup, you’re flying blind—unable to see which pages Google indexes, what keywords drive traffic, or what technical issues prevent rankings.
Many website owners skip Google Search Console setup entirely or configure it incorrectly, creating data gaps that hide critical SEO problems until rankings collapse. This happens because most guides either oversimplify the process or assume technical knowledge beginners don’t have.
This complete 2026 guide shows exactly how to submit website to Google Search Console using the URL prefix property method. You’ll get step-by-step instructions with screenshots, multiple verification options, and practical tips to avoid common mistakes that cause verification failures.

Why You Need to Submit Website to Google Search Console
Before diving into the setup process, understanding why you must submit website to Google Search Console clarifies what you gain from proper configuration.
Monitor Search Performance
Google Search Console shows which search queries bring visitors to your site, how many impressions your pages receive, your average click-through rates, and where your pages rank. This first-party data from Google is more accurate than any third-party rank tracking tool.
Track Indexation Status
Google can discover your site without Search Console, but you can’t verify which pages it actually indexed without it. Search Console tells you precisely which pages Google includes in search results and which ones it excludes—plus the reasons why.
Identify Technical Issues
Mobile usability problems, Core Web Vitals failures, structured data errors, security issues, and manual penalties all appear in Search Console. These notifications often provide the only warning before traffic drops.
Submit Sitemaps
While Google eventually discovers most pages through crawling, submitting an XML sitemap through Search Console helps Google find your important pages faster and understand your site structure better.
Request Indexing
When you publish new content or update important pages, you can request indexing through Search Console rather than waiting days or weeks for Google to naturally discover the changes.
Understanding URL Prefix Properties
When you submit website to Google Search Console, you choose between two property types: Domain properties and URL prefix properties. This guide focuses on URL prefix properties because they’re easier to verify and suit most website owners’ needs.
What is a URL Prefix Property?
A URL prefix property tracks data for URLs that begin with the exact prefix you specify. If you add https://www.example.com as a URL prefix property, Google Search Console only tracks pages starting with that precise string.
Important characteristics:
- Includes the protocol (http or https)
- Includes or excludes www based on what you specify
- Includes paths if you add them
- Does not automatically include subdomains
- Requires exact match for all URLs
URL Prefix vs Domain Property
URL Prefix Properties:
- Track specific URL versions only
- Offer five verification methods
- Perfect for single-site configurations
- Allow subdirectory tracking (like /blog/)
- Faster and easier to verify
Domain Properties:
- Track all subdomains and protocols
- Require DNS verification only
- Better for complex site structures
- Aggregate all data in one view
- More technically demanding
For most website owners managing a straightforward site, URL prefix properties provide everything needed without DNS complexity.
Step 1: Create or Sign Into Your Google Account
You need a Google account to access Google Search Console. If you already have Gmail, Google Drive, or any Google service, you’re ready. If not, create a free Google account at accounts.google.com.
Important consideration:
Use the Google account you’ll access long-term. Many businesses create a dedicated Google account specifically for Search Console rather than using a personal Gmail address. This prevents access problems when team members change roles.
Once you have your Google account credentials ready, proceed to the next step.
Step 2: Access Google Search Console
Navigate to search.google.com/search-console in your web browser. Sign in with your Google account if prompted.
If you’ve never used Google Search Console before, you’ll see a welcome screen with a blue “Start now” button. Click it to begin the setup process.
If you already have properties in Google Search Console, you’ll see your existing sites. Click the property dropdown in the top left corner, then select “Add property” at the bottom of the dropdown menu.
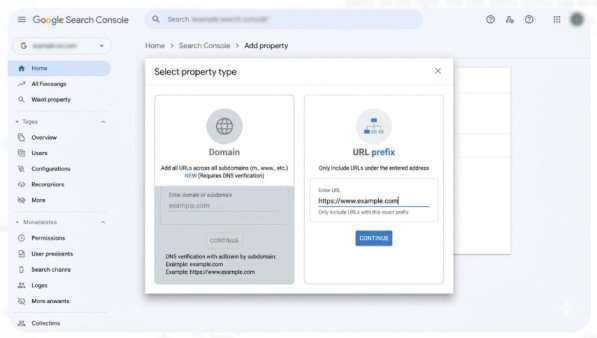
Step 3: Choose URL Prefix Property Type
The property selection screen shows two options: Domain and URL prefix. For this guide, we’re using the URL prefix method.
To add a URL prefix property:
- Click the “URL prefix” option on the right side
- Copy your website’s exact homepage URL from your browser
- Paste it into the URL prefix field
- Ensure the URL includes the protocol (https://) exactly as it appears in your browser
- Include www if your site uses it (https://www.example.com)
- Exclude www if your site doesn’t use it (https://example.com)
- Click “Continue”
Critical detail:
The URL you enter must match exactly how your site appears in browsers. If you enter https://example.com but your site actually uses https://www.example.com, your data won’t match your actual traffic.
To verify which version your site uses, visit your homepage and copy the full URL from the browser address bar. That’s the exact string you should enter.
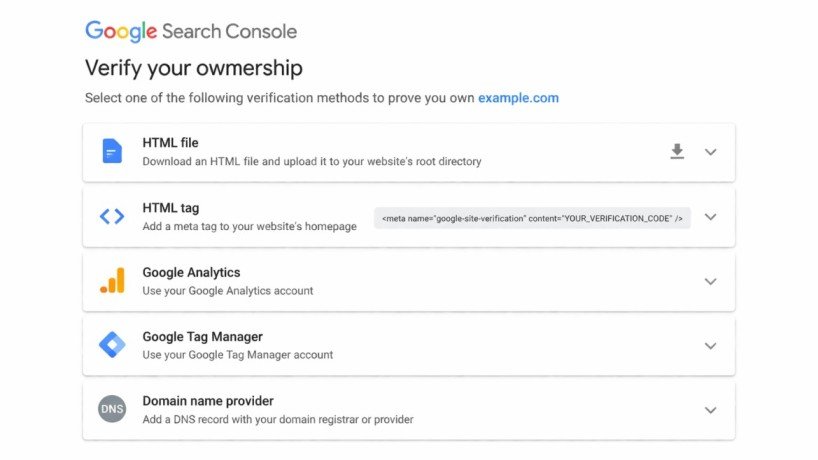
Step 4: Choose Your Verification Method
After clicking Continue, Google Search Console presents five verification methods. Each method confirms you control the website. Understanding how to submit website to Google Search Console includes choosing the right verification method for your technical access level and platform.
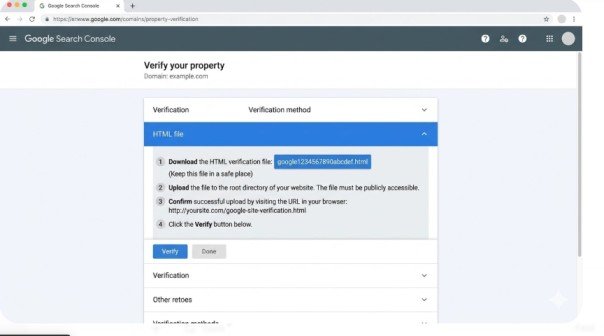
Method 1: HTML File Upload (Recommended for Beginners)
This method works for anyone with FTP access or file manager access through their hosting control panel.
Steps:
- Click “HTML file” in the verification methods list
- Download the verification HTML file Google provides
- Access your website’s root directory via FTP or file manager
- Upload the verification file to the root directory (same location as index.html)
- Test that the file is accessible by visiting yoursite.com/google123456789.html in your browser
- Return to Google Search Console and click “Verify”
Common mistake:
Uploading the file to the wrong directory. The root directory is typically /public_html/, /www/, or /html/ depending on your host. If unsure, ask your hosting provider.
Method 2: HTML Meta Tag
This method works if you can edit your website’s HTML code directly, which is common with WordPress, custom-built sites, or any CMS allowing header modifications.
Steps:
- Click “HTML tag” in the verification methods list
- Copy the complete meta tag Google provides
- Access your website’s code editor or theme editor
- Paste the meta tag inside the <head> section of your homepage
- Save your changes
- Return to Google Search Console and click “Verify”
For WordPress users:
You can add the meta tag through your theme editor (Appearance > Theme Editor > header.php) or use a plugin like “Insert Headers and Footers” to avoid editing code directly.
Method 3: Google Analytics
If you already have Google Analytics installed on your site, this verification method requires no additional code.
Requirements:
- Must have “edit” permissions for the Google Analytics property
- Must use the same Google account for both Search Console and Analytics
- The Analytics tracking code must be in the <head> section
- Cannot use if Analytics is installed via Google Tag Manager
Steps:
- Click “Google Analytics” in the verification methods list
- Ensure your homepage contains the analytics.js or gtag.js tracking code
- Click “Verify”
Important limitation: If you installed Google Analytics through Google Tag Manager, this verification method won’t work. Use HTML tag or HTML file instead.
Method 4: Google Tag Manager
If you manage your site’s tracking codes through Google Tag Manager, this verification method works well.
Requirements:
- Must have “Publish” permission for the Tag Manager container
- Must use the same Google account for both Search Console and Tag Manager
- The <noscript> portion of the Tag Manager code must be immediately after the opening <body> tag
Steps:
- Click “Google Tag Manager” in the verification methods list
- Verify your Tag Manager container is properly installed
- Click “Verify”
Method 5: Domain Name Provider (DNS)
While typically associated with Domain properties, you can also use DNS verification for URL prefix properties. This requires access to your domain registrar’s DNS settings.
Steps:
- Click “Domain name provider” in the verification methods list
- Copy the TXT record Google provides
- Log into your domain registrar (GoDaddy, Namecheap, Cloudflare, etc.)
- Navigate to DNS management for your domain
- Create a new TXT record
- Paste the verification string into the TXT record value
- Save the DNS changes
- Wait 5-15 minutes for propagation
- Return to Google Search Console and click “Verify”
Note: DNS propagation can take up to 48 hours in rare cases, though most changes propagate within minutes.
Step 6: Complete Verification
After following the steps for your chosen verification method, click the “Verify” button in Google Search Console.
If verification succeeds, you’ll see a success message and gain immediate access to your property. Search Console begins collecting data from this moment forward.
If verification fails, double-check that:
- Your verification code or file is in the correct location
- You didn’t accidentally add extra spaces when copying code
- Your verification file is accessible at the expected URL
- DNS changes have fully propagated (for DNS method)
- Your Google Analytics or Tag Manager code is in the correct section
You can leave the verification screen and return later without losing your progress. Your verification code remains valid indefinitely.
Step 7: Submit Your XML Sitemap
After successful verification, submit your XML sitemap to help Google discover and crawl your pages more efficiently.
Steps:
- In Google Search Console, click “Sitemaps” in the left menu
- Enter your sitemap URL in the field (typically yoursite.com/sitemap.xml)
- Click “Submit”
Google processes your sitemap within hours and shows you which URLs it found and any errors encountered.
If you don’t have a sitemap yet:
- WordPress: Use a plugin like Yoast SEO or RankMath to generate one automatically
- Other platforms: Most modern CMS platforms generate sitemaps automatically
- Custom sites: Use an XML sitemap generator tool or create one manually
Step 8: Request Indexing for Key Pages
For important pages you want indexed immediately, use the URL Inspection tool.
Steps:
- Copy the URL of the page you want indexed
- Paste it into the search bar at the top of Google Search Console
- Wait for the inspection results
- Click “Request Indexing”
Google adds your page to its priority crawl queue, though indexing still isn’t guaranteed. This works well for new content, updated pages, or fixing previously excluded pages.
Common Mistakes When You Submit Website to Google Search Console
Avoid these errors that cause verification failures or incomplete data:
Mistake 1: Wrong URL Version
Entering https://example.com when your site uses https://www.example.com creates a property that doesn’t match your actual traffic. Always copy the exact URL from your browser.
Mistake 2: Removing Verification Code Too Soon
Some website owners remove the HTML tag or file immediately after verification. Keep your verification code in place permanently. Removing it can cause verification to fail during Google’s periodic re-checks.
Mistake 3: Not Verifying All URL Variations
If your site is accessible at both www and non-www versions, create separate properties for both. Otherwise, you’ll miss data from one version.
Mistake 4: Ignoring HTTPS vs HTTP
If you recently migrated from HTTP to HTTPS, add a new property for the HTTPS version. Keep the old HTTP property to track the migration’s impact.
Mistake 5: Skipping Sitemap Submission
While optional, submitting your sitemap significantly speeds up initial indexing and helps Google understand your site structure.
What Happens After You Submit Website to Google Search Console
Data begins appearing in your property within 24-48 hours. Initial reports may show limited data as Google needs time to process your site.
Timeline expectations:
- Day 1-2: Basic property setup complete, minimal data
- Day 3-7: Performance data starts appearing for indexed pages
- Week 2-4: More comprehensive data as Google fully crawls your site
- Ongoing: Daily updates with 2-3 day data lag
Check your Search Console property weekly at minimum. Set up email notifications in Settings so Google alerts you to critical issues like manual actions, security problems, or significant indexing drops.

Conclusion
Learning how to submit website to Google Search Console using the URL prefix property provides essential visibility into how Google sees and ranks your site. The process takes 10-15 minutes and requires no advanced technical skills when following the HTML file or HTML tag methods.
This step-by-step guide walked you through creating your Google account, accessing Search Console, choosing the URL prefix property type, selecting a verification method, completing verification, and submitting your sitemap. You also learned common mistakes to avoid and what to expect after submission.
Don’t wait until rankings drop to discover indexing problems or technical issues. Submit your website to Google Search Console this week. Choose the URL prefix property type, select the HTML file or HTML tag verification method, complete the setup, and begin monitoring your search performance immediately.
The data Google Search Console provides—search queries, click-through rates, indexation status, and technical issues—is irreplaceable for making informed SEO decisions. Your competitors who properly configure Search Console have visibility you’re missing without it.
Take action now. Open search.google.com/search-console, follow these steps exactly, and gain the search insights your website needs to succeed.
Frequently Asked Questions
Do I need Google Analytics to submit website to Google Search Console?
No. Google Search Console and Google Analytics are independent tools. You can use Search Console without Analytics, though connecting them provides richer insights.
How long does verification take?
Verification is instant once you complete the steps correctly. However, DNS verification can take 5-15 minutes for propagation. Data collection begins immediately after verification.
Can I use the same verification method for multiple properties?
Yes. The same HTML tag or file works across multiple properties for the same website. You only need to verify once, then add additional properties as needed.
What if verification fails?
Double-check your verification code placement, ensure files are accessible at the expected URLs, and verify you’re signed into the correct Google account. Wait 10-15 minutes after DNS changes before attempting verification.
Meta Description
Learn how to submit website to Google Search Console using URL prefix property! Complete 2026 step-by-step guide with screenshots, verification methods, and expert tips.