
Your SEO agency can’t see your Search Console data because you accidentally gave them restricted access instead of full permissions—wasting weeks of potential optimization.
Learning how to give user access in Google Search Console correctly prevents these collaboration failures. Proper permission management ensures team members, consultants, and agencies get exactly the right level of access they need without creating security vulnerabilities or limiting critical SEO functions.
Most website owners either grant excessive permissions (making everyone an owner) or insufficient access (restricting consultants who need to submit sitemaps). Both approaches create problems. Excessive permissions risk accidental data deletion or unauthorized changes. Insufficient permissions force your SEO team to constantly request actions you could delegate safely.
This comprehensive 2026 guide shows exactly how to give user access in Google Search Console with step-by-step instructions, clear explanations of each permission level, practical guidance for choosing the right access type, and solutions for common access management problems that derail collaboration.

Understanding Google Search Console Permission Levels
Before you give user access in Google Search Console, understanding the four permission levels prevents assigning incorrect access that creates problems later.
Owner (Verified and Delegated)
Owners have complete control over the property. They can add or remove users, change settings, view all data, and use all tools. Google Search Console requires at least one verified owner for any property to remain accessible.
Verified Owner:
Proves ownership through verification tokens like HTML files, meta tags, or DNS records. Can add or remove other owners including delegated owners. Maintains independent access even if other owners lose access.
Delegated Owner:
Receives owner permissions from a verified owner without completing verification. Can manage users and settings but loses access if the verified owner who granted permission loses their own access. Appears as “Owner” in settings without associated verification tokens.
Full User
Full users can view all data and perform most SEO-related actions but cannot manage property-level settings or other users. They can submit sitemaps, request URL indexing, validate fixes, use the URL Inspection tool, and access the Links Disavow tool. This permission level suits most SEO professionals, consultants, and agencies who need operational access without administrative control.
Restricted User
Restricted users can only view performance data and reports. They cannot take any actions, submit sitemaps, request indexing, or manage users. This read-only access works for stakeholders, executives, or reporting teams who need visibility without operational responsibilities.
Associate
Associates perform specific actions for your site or access particular data without direct Search Console account access. Their permissions vary by association type, such as managing Chrome Web Store listings. Most standard collaboration scenarios don’t require associate access.
Step-by-Step: How to Give User Access in Google Search Console
Step 1: Sign Into the Correct Google Account
Navigate to search.google.com/search-console and sign in with the Google account that has owner permissions for the property you want to share. If you manage multiple Google accounts, verify you’re logged into the correct one before proceeding—this prevents the common “I added you but you can’t see it” problem.
Step 2: Select the Correct Property
Click the property dropdown in the top-left corner and select the specific website property you want to share. Google Search Console properties are either domain properties (covering all subdomains and protocols) or URL prefix properties (covering specific URL versions). Ensure you select the property matching what the new user needs to access.
Step 3: Navigate to Settings
Scroll down the left sidebar navigation and click “Settings” at the bottom. The Settings panel contains all property-level configurations including user management.
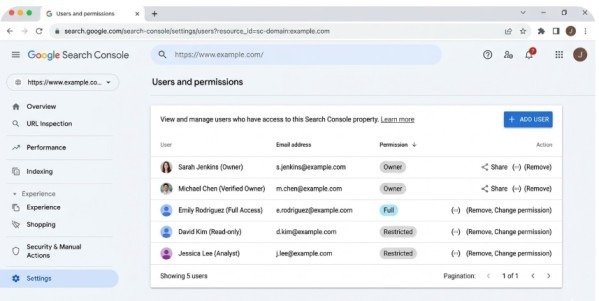
Step 4: Open Users and Permissions
In the Settings menu, click “Users and permissions.” This page displays all current users with their permission levels and provides options to add new users or modify existing access. Only property owners see this section—if it’s missing, you don’t have owner permissions for the selected property.
Step 5: Click Add User
Click the blue “ADD USER” button in the top-right corner of the Users and permissions screen. This opens the user addition dialog where you’ll specify who gets access and at what level.
Step 6: Enter Email Address
In the “Add user” dialog, enter the exact email address associated with the user’s Google account. The email must be linked to an active Google account—Google Search Console cannot add distribution lists, group emails, or non-Google email addresses.
Critical detail: Confirm the email address spelling before clicking add. Users logging in with different email addresses won’t see the property even if you added them correctly.
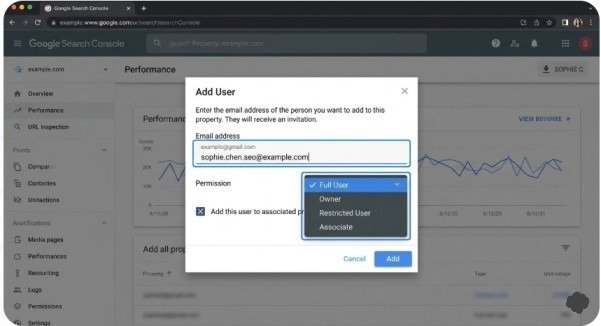
Step 7: Select Permission Level
Choose the appropriate permission level from the dropdown menu. For most scenarios:
- SEO agencies and consultants: Full user access
- Team members managing SEO: Full user access
- Executives viewing reports: Restricted user access
- Developers needing complete control: Delegated owner access
Avoid granting owner permissions unless the user genuinely needs to manage other users or property-level settings. Following the principle of least privilege—granting only the minimum access required—improves security and prevents accidental property modifications.
Step 8: Confirm and Add
Click the “ADD” button to complete the process. The new user appears immediately in the users list with their assigned permission level. They can access the property immediately by logging into Google Search Console with their Google account—no email invitation or acceptance process required.
Choosing the Right Permission Level When You Give User Access
When you give user access in Google Search Console, selecting appropriate permissions prevents both security vulnerabilities and operational bottlenecks.
Give Full User access to:
- SEO agencies managing your organic search strategy
- In-house SEO specialists optimizing site performance
- Developers fixing technical SEO issues
- Consultants who need to submit sitemaps and request indexing
Give Restricted User access to:
- Marketing managers reviewing performance reports
- Executives monitoring SEO metrics
- Content teams viewing keyword data
- Stakeholders needing read-only visibility
Give Owner access to:
- Internal administrators responsible for overall property management
- Trusted partners requiring complete control
- Team members who must manage other users’ permissions
Never grant owner access simply because someone requested it. Most operational SEO work succeeds perfectly with full user permissions.
Common Issues When You Give User Access in Google Search Console
User Cannot See the Property
Solution: Verify the user logs in with the exact email address you added. Confirm you selected the correct property when adding them. Check that the user isn’t filtering properties using the property search function.
Permission Denied Error
Solution: This occurs when adding a user who already owns a parent property. Google Search Console prevents granting lower permissions on child properties to users with higher permissions on parent properties. You can only add such users as owners.
User Needs Different Permission Level
Solution: Navigate to Settings > Users and permissions, click the three-dot menu next to the user’s name, select “Change permissions,” choose the new level, and save. Permission changes take effect immediately.
Removing Users Who No Longer Need Access
Solution: In Users and permissions, click the three-dot menu next to the user and select “Remove access.” For verified owners, also remove their verification tokens (listed in the removal warning or under “Unused ownership tokens”) to prevent them from regaining access by re-verifying.
Best Practices for User Access Management
Review user access quarterly to remove former employees, completed consultants, or outdated accounts. Unnecessary users represent security risks and clutter your user list.
Document who has what access level and why. When team members change roles or contractors complete projects, clear documentation helps you audit and update permissions appropriately.
Use restricted access as your default for new users who don’t explicitly need operational permissions. You can always upgrade access later, but reducing permissions feels like a demotion that creates friction.
For temporary contractors or short-term consultants, create calendar reminders to review and remove their access when contracts end. Forgotten access persists indefinitely without manual removal.
Conclusion
Learning how to give user access in Google Search Console correctly enables effective collaboration while maintaining property security. The process takes less than two minutes—sign in, select your property, navigate to Settings > Users and permissions, click Add User, enter their email, choose appropriate permissions, and confirm.
The critical decision lies in selecting the right permission level. Full user access suits most SEO professionals and consultants who need operational access without administrative control. Restricted access provides read-only visibility for stakeholders and executives. Owner access should remain limited to internal administrators managing the property.
Start this week. Audit your current Search Console users, remove outdated access, and verify each active user has appropriate permissions for their role. When onboarding new team members or agencies, follow this guide to give user access in Google Search Console with confidence that you’re granting exactly the right level of access for successful SEO collaboration.
Frequently Asked Questions
Can I grant temporary access to Google Search Console?
Google Search Console doesn’t offer time-limited access natively, but you can manually remove users at any time through Users and permissions. Set calendar reminders to remove temporary users when their access period expires.
What permission level should SEO agencies receive?
Full user access provides agencies everything they need—sitemap submission, URL inspection, indexing requests, disavow tool access—without granting property management control. Reserve owner access for internal team members.
How many users can I add to one property?
Google Search Console allows up to 100 non-owner users per property, plus unlimited owners. This limit rarely affects normal usage.
Do users receive email notifications when added?
No. Google Search Console adds users silently without sending invitation emails. Inform new users directly that you’ve granted access and tell them to log into search.google.com/search-console to see the property.
Can I change a user’s permissions after adding them?
Yes. Navigate to Users and permissions, use the three-dot menu next to the user, select “Change permissions,” choose the new level, and save. Changes apply immediately.
Meta Description
Learn how to give user access in Google Search Console! Complete 2026 step-by-step guide with permission levels, security tips, and common troubleshooting solutions.